OPTION 2: (from Taylor's Guide to Container Gardening)
|
from Taylor's Guide to Container Gardening Hypertufa: Lightweight Do-It-Yourself Stone American rock gardeners have long admired the English use of antique stone sinks for containers. Carved from soft rock, the sinks have proved an effective and charming home for alpine plants. Those who donĺt grow alpines but like the looks of stone often plant sinks with cacti, succulents, and other plants. Nice idea---if you can find an old stone sink. Not many of us can, but you can make a reasonable copy. Rock gardeners have been doing it for decades. These facsimiles are called hypertufa troughs. The first troughs imitated the look of the original stone sinks and were fashioned by applying a mixture of cement, peat moss, and vermiculite or perlite over chicken-wire reinforcement. Modern trough makers have eliminated the cumbersome chicken wire, adding strands of a concrete reinforcement called Fibermesh to the recipe to provide the same sort of strength. A cottage industry producing hypertufa containers now flourishes in some areas, and you can buy these troughs at garden centers in some cities. The mix described here for making your own was developed by Ernie Whitford, an avid rock gardener in Colorado. Making your own trough requires an afternoon of work and several weeks of patience as the mixture cures thoroughly. The ingredients are equal volumes of perlite, sphagnum peat moss, and dry cement, and about one handful of the fluffy Fibermesh per gallon of mix. (For the dealer nearest you, con- tact Fibermesh Company, 4019 Industry Dr., Chattanooga, TN 37416; 615-892-7243.) To color the "stone", add 1 ounce of powdered cement dye per gallon of mix. A trough 15 inches square requires about 3 gallons of mix.
Making the trough Mix the ingredients in a large bucket or wheelbarrow. Protect your hands with rubber gloves and your lungs with a dust mask or scarf. When the dry ingredients are thoroughly mixed together, add just enough water to produce a slurry the consistency of cottage cheese---this doesnĺt take much water.
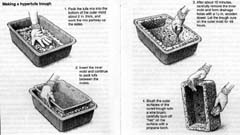
The mixture is often formed between two molds, an inner and an outer. (See picture) You can make these of wood or improvise with containers of the desired size. Two rectangular plastic tubs, one 4 inches longer and wider than the other, will nest together to produce a trough with sides 2 inches thick; a round container can be made by nesting the top 6 inches of a 7-gallon plastic nursery container inside the top 6 inches of a lO-gallon container. Sharp corners are easily chipped, so make or select molds with rounded corners. Before each use, coat the contact surfaces of the molds with linseed oil, which will act as a release agent. Cover a worktable with a sheet of plastic and position the molds on it. Then, with gloved hands, pour the mixture and build up the bottom of the trough to about 2 inches thick. (Do this on the plastic sheet for bottomless molds.) Next, pack the mixture tightly between the inner and outer molds. Wait about 10 minutes, then remove the inner mold. You can form drainage holes in the bottom with a Ĺ/2-inch dowel, and round the inner corners now, too. Without moving the mold and mixture, cover them with plastic so that the mixture doesnĺt dry too fast, and let it cure for 48 hours. After curing, remove the outer mold. (If youĺve forgotten to make the drainage holes, do so now with a screwdriver.) Brush the outer surfaces of the trough with a wire brush to enhance the texture; donĺt worry about the "cat hair" look this will create. Cover the trough with plastic again and let it cure another two weeks; you can move it now, hut pick it up by the bottom and handle it carefully to avoid hairline cracks. Wash the trough several times as it cures to leach out excess lime, which would otherwise affect the pH of your potting soil. Complete the trough after two weeks by burning off the "cat hair" with a propane torch. Take care not to let the torch heat any spot too much---damp pockets in the walls might burst, forming small pits or cracks. If the mix is not runny, you can make a trough with a single mold, such as a cat litter tray, or make a free-form trough over a mold made of damp sand, the way sand candles are made. Cover these molds with about 2 inches of the mixture, as evenly as possible. It is especially important not to skimp in the corners and rim. Follow the previous instructions for curing. Planting the trough Cover the drainage holes with crockery or wire screen. If youĺre planting alpines, the soil mixture should generally be both organically rich and well drained. Consult a nursery specialist to determine which alpine perennials grow best in your region. Choose plants with a slow growth rate. Young plants in 2ĺ/4-inch pots arc an ideal size for starting out. (If you put other sorts of plants in troughs, plant them as described for terra-cotta.) Fill the trough nearly to the rim with the soil mix. Arrange rocks, if you desire, on top. A rule of thumb is that rocks in nature, like icebergs, are mostly below ground. For a "natural" look, bury up to two-thirds of the rock, or position the rock so that it looks as though thereĺs more rock below, even if there isnĺt. Planting takes time, carefully scooping out holes between the rocks to position the plants. Spread a mulch of coarse gravel that marches the rocks (available at aquarium stores). Mulch fills crevices, prevents rot by keeping moisture away from the bases of the plants, keeps roots cool, and retards evaporation. Because alpine plants suitable for troughs grow slowly, these little rock gardens are long-term projects. The plants can live outside throughout the year, even in cold climates, but they should be placed in the shade of a fence or building in winter to prevent the destructive freeze-thaw cycle from distressing both container and plants. They can also be overwintered in a bright, cool greenhouse or a cold frame.
|
OPTION 3: (While visiting the Philadelphia Flower Show, this formula was given to us by Betty Mackey of B.B. Mackey Books at www.mackeybooks.com )
A Super Lightwieght Garden Trough
Hypertufa: A Simple 3-4-5 Lightweight Do-It-Yourself Artificial Stone
The basic formula is easy:
For more information about these uses of perlite in turf grass applications, landscaping, and/or container growing, please call or contact us at:
The Schundler Company
Back to Horticultural Main Page
10 Central Street
Nahant, MA 01908
(ph)732-287-2244 (fax) 732-287-4185
www.schundler.com